
While many photographers are familiar with RAW images, not everyone is, and there is some misinformation out there as well. In this post, I discuss the differences between RAWs and camera-generated JPEGs, the advantages of each, and ways to decide which is best for you. I also discuss a new file format called HEIF.
What is RAW?
A RAW file contains the image as captured from the camera’s digital sensor, with minimal to no processing. Decoding software on your computer or device is required to turn this sensor data into an image on screen. Decoders also improve with time, so RAW files shot ten years ago often look better now, than they did when originally decoded. On the downside, different decoders will produce somewhat different results for the same RAW file.
Camera-generated JPEGs
JPEG is a standard file format and JPEGs look the same on all computers. All digital cameras capture RAW data, but they do not necessarily offer a way to store that RAW data in a file. Instead, cameras have specialized hardware to convert that RAW data to a JPEG file. You can influence this conversion in many cameras through their on-board menus. The controls are quite extensive in higher-end cameras. Many cameras also have built-in styles or scenes for challenging shooting conditions (like indoor portraits or fireworks). The most important thing to realize is that once the camera makes the JPEG, much of the image’s appearance is locked down and some image data has been discarded. This is not true of RAWs. RAWs contain all the data about the shot, and anything in a RAW can be changed afterward.
It’s Like Carry Out vs. Cooking at Home
Camera-generated JPEGs are like carrying out food from a restaurant. You usually get a nice meal, made by a professional. However, if you want it mild and the restaurant makes it spicy, you can’t completely eliminate the spice. If you ordered a pizza and the bottom is a little burned, you can’t unburn it. Similarly, you cannot turn a black and white JPEG back into color – the color information is lost. If the camera uses aggressive noise reduction and loses detail, then that’s what you’re stuck with.
Editing RAWs is like cooking at home. You can substitute freely, and you can adjust the recipe as you go. You may make mistakes but you can also correct them before you serve the dish. But it’s more work and takes more time (and like a well-equipped kitchen, you need better gear, like a faster computer and more storage space). Advanced photo editors give you full control over the RAW’s appearance.
Advantages of RAWs
RAWs can store all of the detail and color richness that camera sensors can record. JPEGs cannot. To explain why, let’s talk briefly about how color or gray is represented in a computer. If you want to represent black or white, you need one digital “bit” to store that. If you need to represent black, white, light gray, or dark gray, then you need two bits, as shown below:
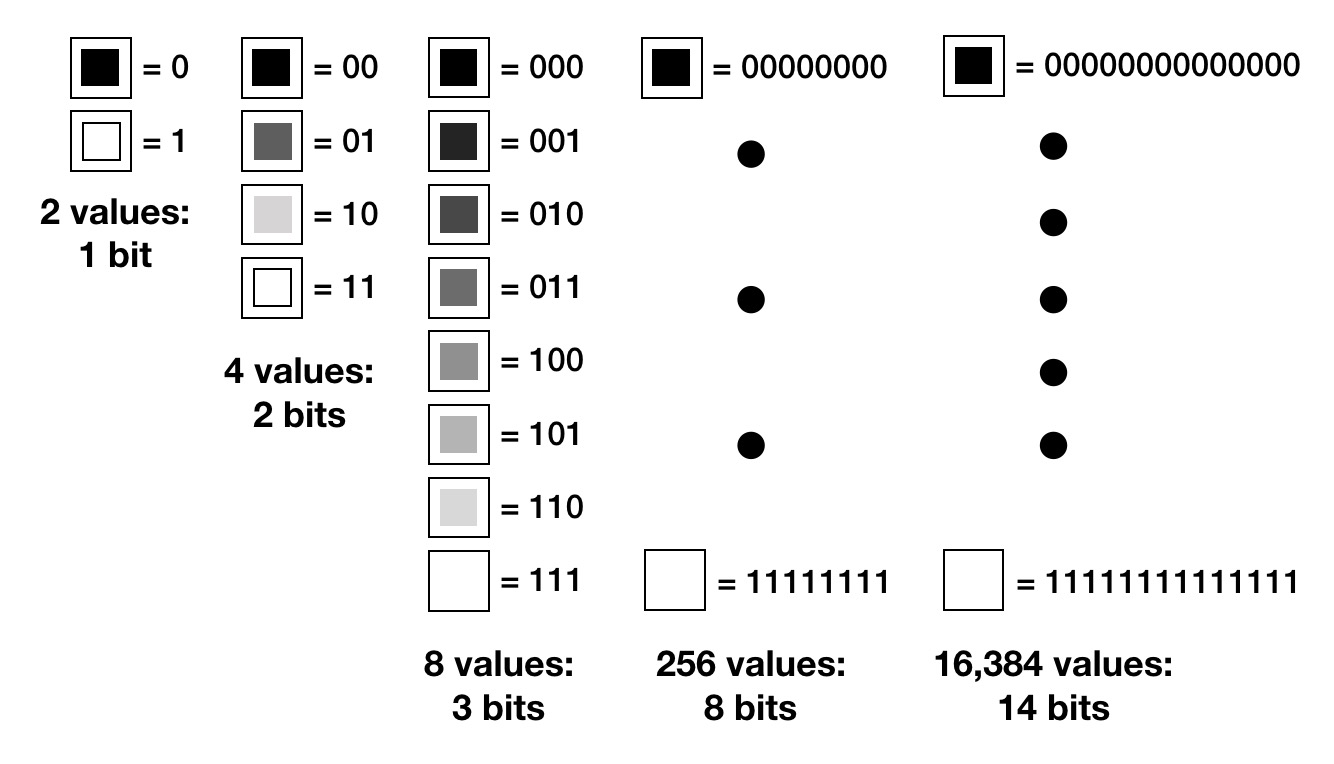
The more bits, the more shades of color or gray you can represent. JPEGs are limited to 8 bits while RAWs can store 16 bits.
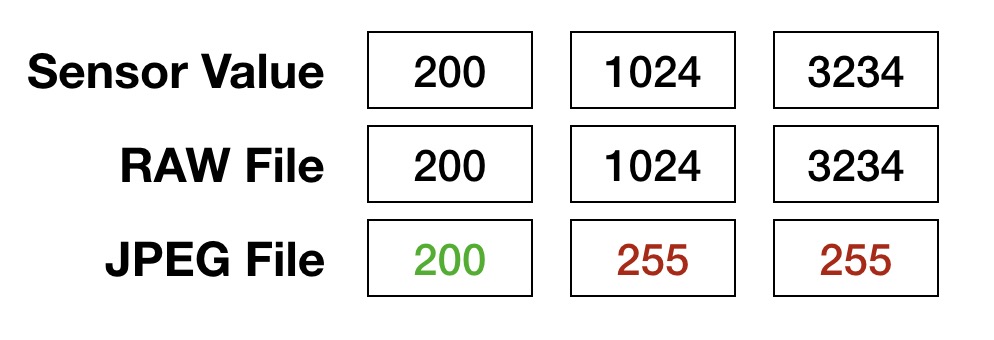
Standard digital cameras have a grid of sensor cells that are sensitive to either red, green, or blue light (a bit like the cones in the human eye). Each cell can capture a brightness value from 0 to as high as 16,383. RAW files can store the entire range of values, but because JPEGs are limited to 8 bits, they can only store brightness values up to 255. When a sensor records a brightness value larger than 255, the number is clamped to 255. This can be devastating to bright areas of the image:
The difference is staggering. RAWs can store over 260,000 times (!) more color information than an equivalent JPEG from the same camera. RAWs can simultaneously capture much darker and brighter parts of a scene (the “dynamic range”). That adds up to richer, higher quality images.
To be clear, the value of 255 is still considered “white”. When a RAW stores a large value like 1024 or 3234, those values are “brighter than white” or “super white”. You cannot normally see such super white colors on your screen, but a RAW editor lets you work with them and bring them into view. In contrast, when your camera makes a JPEG from sensor data, it makes a decision about what is “white” and what is “black.” Areas darker than this “black” value are clamped to black, and areas brighter than white are clamped to white. The extra information that the sensor captured is lost forever.
With a RAW, you can reveal at least 2 stops of detail in over-exposed (bright) areas. This is impossible to do with a JPEG. Similarly, while a JPEG has a fixed value of zero for black, the concept of black is controllable in a RAW (this is called the black floor or black point). The camera (and decoder) will have a definition of black, but you can raise or lower this definition while you edit. This can be a life-saver if all the detail in the darkest areas of an image has been smashed into a black smudge.
Here are two good examples of recovering detail. In both examples, the left image is the original RAW. For the middle image, I lowered the exposure by 2 stops, and lifted the shadows. The right image applies the same exposure and shadow operations to a JPEG. (I can make the RAW look better than this using RAW-only controls, but I made sure to do exactly the same operations on both the RAW and JPEG).
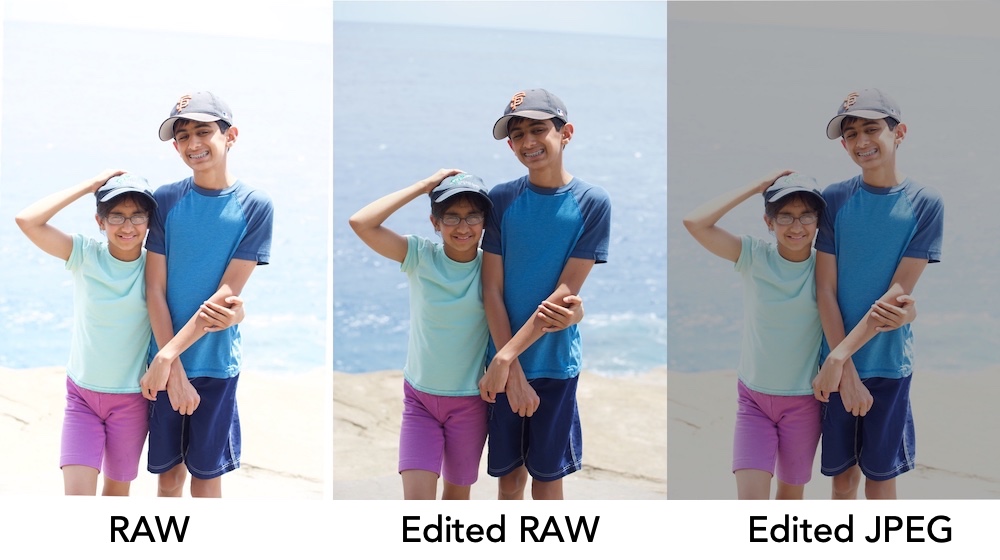
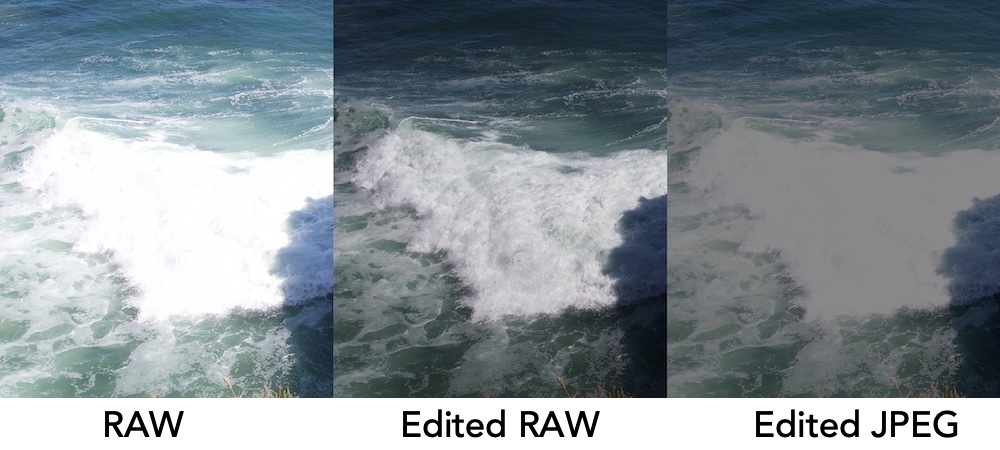
The background color and detail is revealed in the RAW, but the background in the JPEG just gets murky and gray. That’s because the camera recorded bright data in the RAW (a variety of values of 1000 or higher), but that same data was clamped to 255 in the JPEG before I could work with it. I should also mention that RAW files store “linear” data, while JPEGs store “gamma-corrected” data. Gamma-corrected data matches the way our eyes perceive light, but gamma-corrected files squash bright areas of the image, making them even harder to edit. A full discussion of linear vs. gamma corrected will have to wait for another time.
RAWs have a wider range of colors (brighter and more saturated) than most JPEGs. This range is called the color “gamut.” While some JPEGs also have a wide color gamut, such as P3 photos taken from newer iPhones, the 8-bit limitation of JPEG becomes an issue, causing banding in some images. Banding causes areas that should have a smooth transition of colors to show obvious lines or blotches. This can be particularly noticeable in the sky. Banding occurs because 8 bits is simply not enough to represent all of the colors defined in the Display P3 or the Adobe RGB color spaces. This artifact does not occur with RAWs because 12 or 14 bits is generally sufficient for P3 or Adobe RGB.
RAWs can be white-balanced better than JPEGs (especially underwater and other extreme lighting situations). In addition, after white balancing a RAW, highlights can turn out better.
Noise reduction and lens correction are much better when done to a RAW than a JPEG. This is because the best time to make such corrections is super-early in the decoding process, before changes in color or brightness have occurred. If you noise reduce a JPEG, the image has already been significantly manipulated by the camera (or software), and critical information has been lost. Some cameras have built-in lens correction for JPEGs, but not all of them, and the corrections are less sophisticated than computer-based software.
A Bit about “HEIF”
Apple has recently popularized an image format called HEIF (High Efficiency Image Format). Pronounced “heef,” this is a standardized and general-purpose format that has many improvements over JPEG, such as support for 12 and 14 bit images, and more efficient compression, which results in smaller files for the same quality. While HEIF has the ability to address a number of the weaknesses of JPEG, images shot on iPhones with HEIF are still 8-bit, and the images have been significantly processed by the camera. In practice, the advantages I list for RAW are still valid for iPhone-generated HEIFs. Apple uses the .heic file extension — those are HEIF files using a specific compression technology. HEIC-based files are roughly half the file size of equivalent JPEGs, which is a big savings, both in cloud storage and on your device.
JPEGs have their place…
I’m not saying that one cannot white balance a JPEG, or perform noise reduction to one. It just doesn’t turn out as well. JPEGs offer their own advantages. Modern cameras produce outstanding JPEGs for well-exposed images. In addition, through a field called “computational photography,” cameras can often generate high-quality JPEGs / HEIFs that exceed what’s possible with a RAW. For example, newer iPhones will often take multiple exposures and combine them into a single high-quality image. This happens automatically – you just see the one final image. These techniques help a lot in low-light, and iPhone JPEGs have less digital noise than an iPhone RAWs. Many iPhones can also create pleasing portrait images with nicely blurred backgrounds.
Panoramas and HDR images are other examples of useful built-in camera features, both of which require a lot of time and effort to replicate using multiple RAW images. Regardless, note that all camera JPEGs have the limitations listed above in terms of editing, dynamic range, sharpness, etc.
| Feature | Winner |
| Smoothness of Colors (bits) | RAW |
| Dynamic Range (bright and dark parts) | RAW |
| Highlight Recovery | RAW |
| White Balance | RAW |
| Overall Editing Flexibility | RAW |
| Minimizing Compression Artifacts | RAW |
| Wider Color Gamut | Usually RAW |
| Noise Reduction / Lens Correction | Usually RAW |
| Best looking right out of camera | JPEG / HEIF |
| Easy Panoramas / HDRs | JPEG / HEIF |
| Smaller Files | JPEG / HEIF |
| Burst Mode Speed | JPEG / HEIF |
Conclusion
RAWs are 16-bit lossless files containing all the information captured by the camera. They have superior color detail, a wide color gamut and extended dynamic range. They offer much better exposure and white balance latitude. They are better suited for lens correction and noise reduction as well.
On the downside, RAWs take up more disk space and take longer to open. RAW Power uses the GPU heavily, so for RAW Power, it’s best to have at least a mid-range Mac that is relatively new (within the last 5–6 years). On iOS, an iPhone 7 or later works well.
For 12 or 14-bit HEIF files, the RAW advantage is lessened, but still present, because RAW files are minimally processed, allowing the maximum latitude when editing. Remember, though, that iOS devices do not generate 12 or 14-bit HEIF files — their HEIFs are only 8 bit.
Bottom line
- If you primarily “shoot and share” with little or no editing to your pictures, then shoot JPEG / HEIF.
- If you are generally happy with the look of the JPEGs from your camera, shoot JPEG (or RAW+JPEG).
- If you want panoramas, HDR, and portrait images as easily as possible, shoot JPEGs.
- If you have limitations on disk space, or if you are going to shoot thousands of pictures quickly on a tight deadline, shoot JPEG (for this reason, professional sports photographers often shoot JPEGs).
Otherwise, if you want the best possible results, and the most flexibility when editing your images, shoot RAW. Your future self will thank you.